Hair MAGIC!??!!??

Monday, June 30, 2014

Hellllooooo friends! Happy last day of June! I can't believe that this month is already over, it seems like yesterday that I was finishing up classes and getting into the swing of summer. I can't imagine how fast July is going to go by :(

Sorry for being a bit MIA on the blog this weekend - I had some surprise family visitors who I hadn't seen in awhile stop by and so I was just spending some quality time with them! 

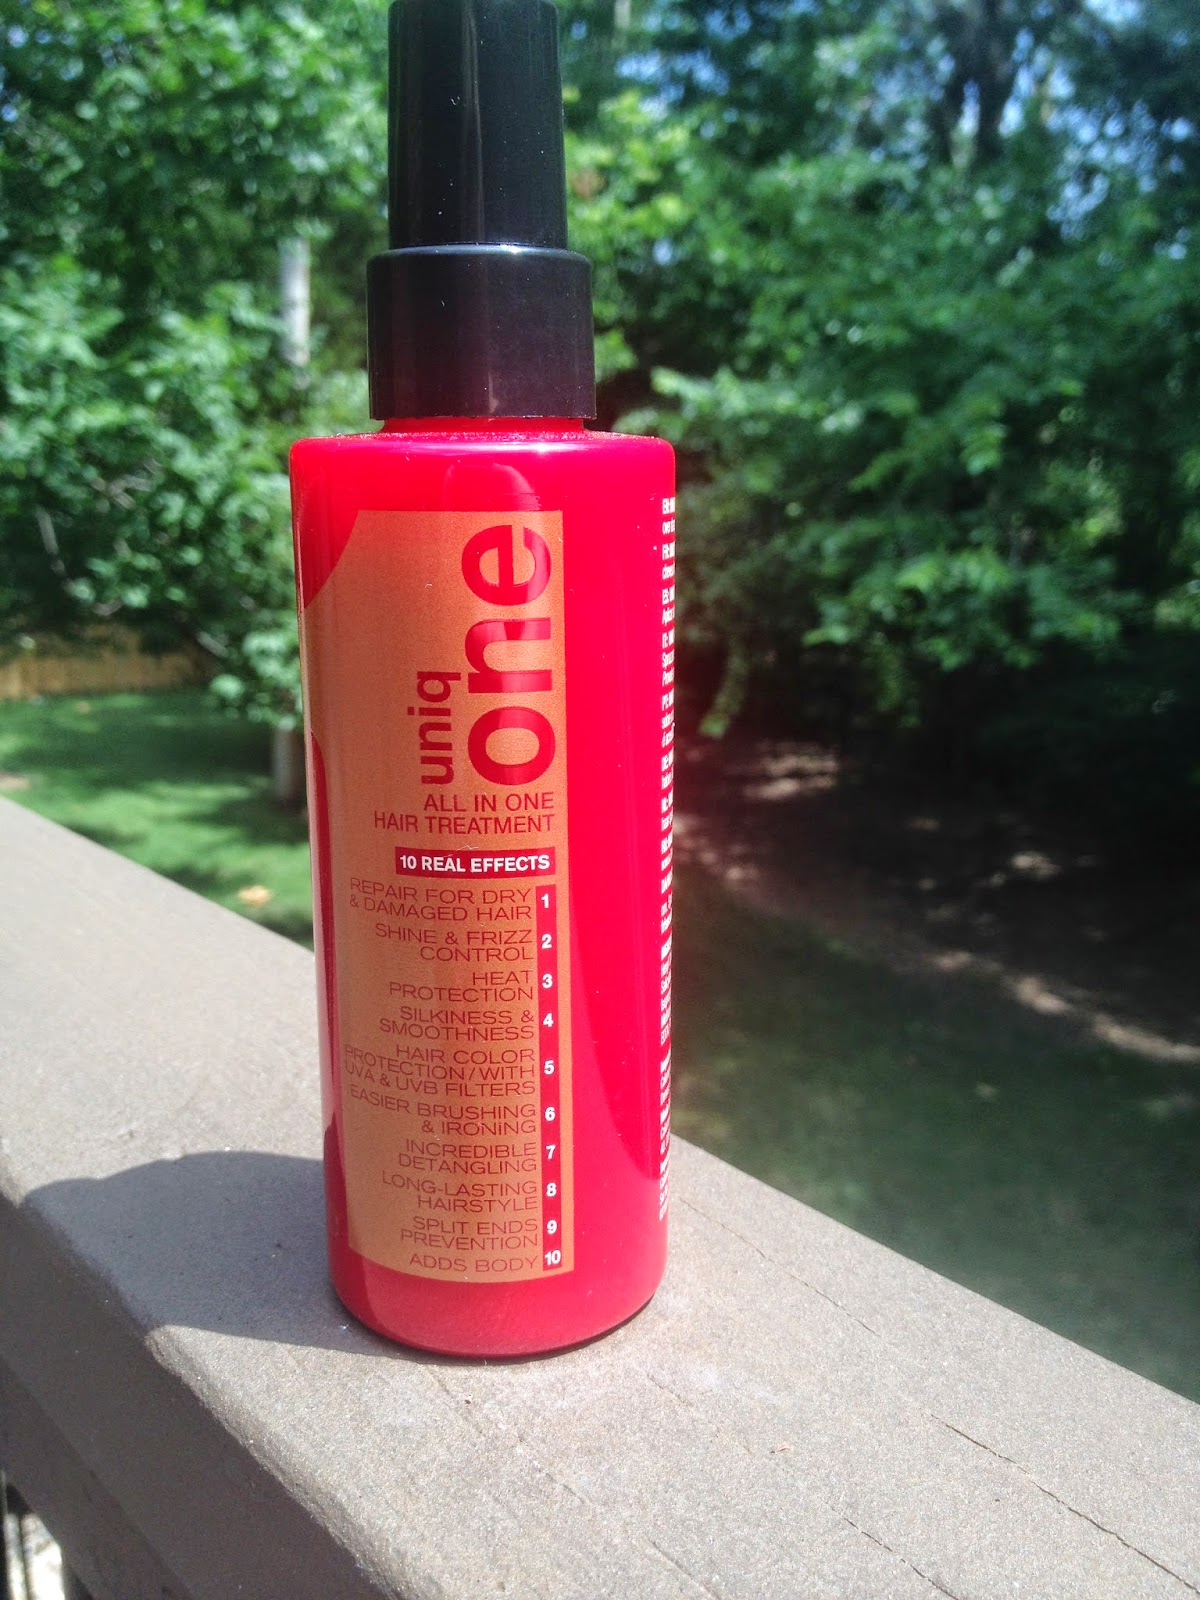
But...back to the blog! Today I'm going to be talking about my absolute favorite hair product - I think ever. The beauty I'm talking about is the Uniq One All in One Hair Treatment. It's this amazing spray for your hair that has 10 Real Effects that treat your hair, keep it healthy, and make it shine. 


The 10 Real Effects:

1. Repair Dry and Damaged Hair
2. Shine and Frizz Control
3. Heat Protection
4. Silkiness and Smoothness
5. Hair Color Protection with UVA and UVB Filters
6. Easier Brushing and Ironing
7. Detangling
8. Long-Lasting Hairstyle
9. Split End Prevention
10. Adds Body

And I can totally attest to these 10 benefits. It does every single one of them. I cannot tell you how healthy, beautiful, and smooth my hair feels and looks after I use this. It's my favorite product and I think I could honestly live without any other product if it meant I could keep using this forever. 

I spray this in my hair when it's damp, usually after my shower and you really don't need much. It immediately shines and detangles your hair, as well as gives you a pump of volume. It also smells fantastic but that's just an added bonus.


I've been using this for a little over a year. My aunt, who is a hairdresser and owns her own salon, used this in my hair and then gave me my own bottle and it's been my go-to product ever since. I love, love, love this stuff and absolutely recommend it as a kind of all-in-one, everything spray! 


Recently, they came out with a limited edition Coconut Uniq One spray and I love that as well. It makes you smell like you've been hanging out on a tropical island and does everything the original spray does.

This costs about $20 depending on where you get it but it lasts such a long time and is such a fantastic product, I really never mind buying this!


What are your favorite hair products?

xo Emily


Outfit of the Day

Friday, June 27, 2014

Hey guys! Today's post is a quick one! I'm visiting family today so I thought I'd show you my Outfit of the Day! 

I went for a flowery, black dress from Brandy Melville with a lace, gold Aerie bralet. I also wore a black cardigan over it all.

Also, excuse the crappy iphone camera photos :)


My face was all my regular makeup with a champagne and golden eye look, and a bronzed crease look.


This was just a quick post today, sorry for the shortness of it! Ha ha.

Hope you all are doing great!

Xo Emily 

A Pop of Blue: Face of the Day

Thursday, June 26, 2014

Hey guys! Today I'm coming to you after watching a very exciting World Cup match! USA vs. Germany didn't dissapoint! I was obviously rooting for the U.S. to win, but I love Germany's team as well so I'm really glad both teams qualified!

Today's is a short post and I'll just show you my 'Face of the Day'. A more apt description would be 'eyes of the day' since that was the focus! 

I used two main eyeshadow duos for this look, which kind of became my focus!

I used the Ulta Baked Eyeshadow Duo in 'Deep Blue Something' which is this gorgeous duo, one dark blue shade and one "oceanic" shade (which is what it looks like to me). It's sparkly and gorgeous! Ulta had a 2 for $8 sale on eye products so it was a great deal! 


I also used the L'Oreal Studio Secrets HiP Professional Metallic Duos in the shade 'Platinum'. It has one super shimmery silver side and a black shimmer side. I love these eyeshadows.


I really love how this look turned out. The sparkle of the shadows looks both blue, silver, and grey and makes for such an amazing shine. 

I just used the lighter blue side of the Ulta shadows for my inner eye, then blended out the dark blue in my crease, adding the black shimmer shade from the Metallic duo. Lastly, I packed on the silver shade from the Metallic duo on the center of my lid.


Easy easy easy.

And because it's all the same type of 'shimmer' shadows, they all blended together nicely.


Hope everyone has had a great day so far!

xo Emily

Drugstore Concealers: The Good, The Bad, And The Crease-y

Tuesday, June 24, 2014

Hey guys! I hope everyone has been enjoying their summer so far! I'm getting really excited about the fourth of july coming up! (that means lake time, lots of bbq, fireworks, and tons of popsicles)

But besides that, today is going to be all about concealers, and in particular, drugstore concealers!!


I love concealers. That was probably apparent in my blog post about the L'Oréal Visible Lift Serum Concealer concealer a few days ago. But, especially with more inexpensive drugstore concealers, I love testing out a few to find the best. 

I am a firm believer in trying out a little bit of everything so over the past few months, I've picked up quite a few drugstore concealers and I thought today would be a perfect day to kind of summarize and review my favorites and least favorites. 

I'm going to talk about 8 different drugstore concealers that I've picked up and used regularly in the past year and give you a bit of information on the product, what I like and dislike about it, and my overall feelings about them! 

Read on for more about these concealers!


Before we begin, a little disclaimer. I'll be giving my honest opinion about these products but what works for me, may not work for everyone else! We've all got different skin and I'll try my best to let you know the good and the bad about all these products in case you have a similar skin type to mine.

For reference, I have normal to dry skin and usually go for the 'Light' shade of most products!!

Okay! Happy Reading (this very long post)!

Sonia Kashuk Hidden Agenda Concealer Palette


The first concealer I'll be talking about is the Sonia Kashuk Hidden Agenda Concealer Palette which runs for about $11. I picked mine up at Target because I think Sonia Kashuk retails out of Target specifically. It comes in two shades (light and medium) and I went with the light palette. Within the palette, there are two 'concealer' shades; one is lighter and one is a bit darker. You can either use just one or mix the two together to find the shade that fits you best. In addition to the two concealer shades, there is a neutralizer shade to get rid of redness and a translucent pressed powder that helps set the concealer. I either use my Real Techniques Detailer Brush and Pointed Foundation Brush to apply this underneath my eyes and on any blemishes on my face or my ring finger! I then use the neutralizer shade to cover the redness around my brow, nose, and anywhere else I might be looking a bit like Rudolph. Lastly, I use the translucent powder to set the concealer I used under my eyes.


What I Like: I really like the multiple concealer shades in this palette. During summer especially, it's nice to have a few options for a concealer shade in a singular palette. When you buy a singular shade of a certain concealer, and then get paler, tanner, etc. - it's frustrating to have to go and buy another concealer in a completely different shade. I also like that it comes with a very effective redness neutralizer and a really nice setting powder. I love using a separate setting powder for my under-eye concealer and this one in the palette makes my under-eyes look great. I also really like the concealer's formula. It's less creamy and more waxy which somehow goes on my skin really well. Although I often use my brush to apply this, I find using your finger gives a bit more of a flawless, airbrushed finish than what the brush does.


What I Don't Like: Even though I like that there are two shades of concealer in this palette, I also dislike the palette for the same reason. (I know, I'm insane) Some people, who stay the same shade all year-round and don't see much change in their skin-tone over the year, can really only use one of the squares in the palette. I think Sonia Kashuk should come out with more shade variations for these palettes! And I feel that for an $11 concealer, there isn't enough product. I've been using this for awhile now, and I really hope it's a trick my eyes are playing on me, because I feel like I'm using this too fast. I also found that it set into my eye wrinkles a bit. I often find this happen with most drugstore concealers on my eyes, because I do have some fine lines underneath (I need to up my skincare maybe?) but I really really hate when foundation or concealer cakes into my wrinkles and lines. Although I found it went into my lines, it also just as easy blended out and then it looked good after a little bit of finagling!


Overall: I like this palette a lot; the two concealers, if you can get over the fact that you may only be able to use one, have a great formula and blend seemly into the skin. I recommend this and probably will be repurchasing this! 


Rimmel Match Perfection Skin-Tone Adapting Concealer


Next up is the Rimmel Match Perfection Skin-Tone Adapting Concealer. This costs about $6, which I think is a pretty good price for a concealer. It comes in 5 shades (Very Fair, Very Fair Light, Light, Light/Medium, and Medium). The product itself is very creamy and comes in a little tube. It has what Rimmel describes as a 'Soft Precision Brush' at the end of the tube from where you have to squeeze the product out. (the photo on the right shows the brush) To apply this, I usually use my ring finger. I find it applies best to skin this way. 


What I Like: I like the shade of this concealer a lot. I go for the 'Very Fair Light' shade and find it works well with my skin tone. As the bottle says, it does have 'skin-tone adapting' powers. I also like the cost and the packaging. It's very easy to pack along with you and is virtually no-mess. It also has good highlighting capabilities.


What I Don't Like: I really dislike the 'soft precision brush' at the end of the tube where the product comes out. It's scratchy and if you use this product everyday, you're prone to infections from the brush. It's highly, highly unhygienic. I find that products without built-in brushes are just easier to use and cleaner overall. It's also difficult to dispense the concealer itself. I always find that not enough, or too much comes out of the tube. I also dislike that this product, which is a self-proclaimed 'concealer', actually works better as a highlighter. And that's fine, because it does wonders to brighten my under-eye area, but the reason I purchased this product was because I wanted a concealer, not a highlighter. It doesn't do anything to cover up my dark under-eye circles, which is what I look for in a concealer. This product also is not pigmented enough. I find that I often use a lot of product because of that and since the tube is so small, if you use this everyday, you will run out fast. This is not a cost-effective product.


Overall: If you're looking for an under-eye color-correcting concealer, this is not the one for you. I also would recommend cutting off the applicator that comes attached to the brush, as it's very unhygienic. If you use a lot of concealer everyday and tend to go for a more high-coverage formula, this is also not the concealer for you. There is just not enough pigment in the product and you end up having to build and build to just have any sort of coverage. For me, I stopped using this concealer after about two weeks because it was not cutting it. I do not plan on repurchasing and find it a huge disappointment.


L'Oréal Visible Lift Serum Concealer


I recently did a post on this L'Oréal Visible Lift Serum Concealer which I've found to be one of my favorite concealers of the moment. This concealer costs about $13, which is pretty pricey. It comes in four shades, (fair, light, medium, and medium/deep) and again, has a brush applicator at the end. I use the shade 'fair'.


What I Like: I really love how long-lasting this concealer is. I put it on in the morning and it's still there, hours and hours later. Pair it with a pressed powder, and the product won't budge. I also really like the formula. It's creamy and soft, without being too runny and it covers under-eye circles nicely. You also can get a bit of a highlight under your eyes with this product, but it still cancels out the dark circles which is my main priority. I also really love the look of the product. It's small and sleek and easy to pop in your purse or pocket!


What I Dislike: I dislike the cost most, but because this is such a great product, I can somewhat look past that. I find that this product does crease a bit, but that's an easy fix as long as I check my face after it's settled into my skin. Applying it with my finger helps to cutdown on it settling into wrinkles and fine lines. I also really dislike that it's a 'clicky, twisty' tube. This means you have to twist the tube until more product comes out: you either get too much or too little of the concealer once it comes out. Couple that with the annoying brush applicator (which I recommend cutting off because of hygiene), it makes for a few annoying gripes.


Overall: I highly recommend this product. If you can get over the $13 price tag (I got mine with a $2 off coupon, so check your local ads), then you'll love this. If you've got dark circles, this will do wonders for them, in addition to brightening up your under-eye. There are only a few little complaints with this product, but nothing major that can't be fixed with a little bit of thinking!


Maybelline FitMe Concealer


Next up is the Maybelline FitMe Concealer. This costs about $7 which is a pretty great price, especially since there's a lot I like about it. It comes in a sleek bottle and slides onto the skin smoothly. It comes in 6 shades, (fair, light, medium, sand, deep, and cafe) which is a pretty good array of shades and colors. I use the shade 'fair'. 


What I Like: I love love love how creamy and blend-able this product is. It slides on so easy and can be blended in seamlessly with a finger or a brush. It works really well in the under-eye area, covering dark circles and discoloration. I also like the coverage. It's not full-coverage and it's not light-coverage, but probably somewhere in between. That's the perfect amount of coverage for me. It's also highly pigmented which is nice.


What I Dislike: This concealer works best under the eyes - I find that on my other blemishes, especially ones near my brows, it cakes and discolors a bit. Another pretty significant complaint is that this concealer creases around the eye a fair amount. It also is quite flaky if you aren't moisturized. 


Overall: I like this concealer if only because the formula is so creamy and blend-able. I love the applicator (see the right side of the photo above) and find that it slides on so nicely on my skin. It also works awesome under my eyes, but I wish it didn't crease so much. I think this is worth its price, and I find myself using it often.  


  Garnier Skin Renew Anti-Dark Circle Concealer Roller


This Garnier Concealer comes in a sleek little bottle and has a rollerball at the end from which the product comes. It only has two shades, light/medium and medium/deep. It's about $11 and has a very thin formula. It's meant to de-puff eyes and conceal the under eye area as well as repair your under eye area.  


What I Like: There's really not a lot I like about this product. I actually had to think about it for a moment. After thinking, I found that I like the feeling of the cold rollerball under my eyes. This concealer is meant to de-puff eyes and I liked that the rollerball was cold when applied to skin: it really helped de-puff my eyes. The packaging is really nice, easy to travel with, and easy to use.


What I Dislike: I dislike a lot about this. First off, I tried the light/medium shade and found it too light for my under-eye area; it didn't do a lot to conceal there. I then tried the medium/deep which was way too deep and orange for me. The color selection is sparse and really does not give you many options. I also hate the formula. It's very runny and too liquidy. I feel like when I apply it under my eyes, it doesn't even blend in, just sets, rolls around, and becomes a gloopy mess. It gets rid of dark circles to an extent, but you can still see them under the product! That's exactly what I don't want a product to do. 


Overall: I will definitely never be repurchasing this again. Other than the cold rollerball (which I found that just buying the Anti-Puff Eye Roller from Garnier actually gave me the depuffing capabilities without the dumb concealer - so there was no point to buying this), it didn't do anything for me. It was too runny, didn't match my skin tone, and didn't do much to conceal. For the price of $11, I find it so incredibly disappointing.


 Maybelline Instant Age Rewind Dark Spot Eraser


The next concealer is the Maybelline Instant Age Rewind Dark Spot Eraser, which unlike the dark circle concealer, is meant more for dark spots on your face. It costs you about $9. This comes in nice, sleek packaging and 5 different shades. (Fair, fair/light, light, light/medium, and medium/deep) I use the shade fair/light.


What I Like: I find that this concealer really does what it says it's going to do; it gets rid of dark spots. I have a few on my face and after placing the product on them, they look 99% better! It also can work as an under-eye concealer. 


What I Dislike: The packaging for this is so incredibly annoying. Not only do you have to click and click and click for product to come out the very first time you use it, but the product comes out onto this little tiny foamy/spongy ball at the top of the tube. It's incredibly unhygienic and gets so so gross as you keep on using it. I also think that the concealer actually comes out a bit orange, especially in lighter shades. 


Overall: I could really skip this. I probably won't repurchase this because there are drugstore concealers that do the same thing better than this product does. I cannot really get over the orange face and horrible packaging. 


 Maybelline Instant Age Rewind Dark Circle Concealer


Next up is another Maybelline Instant Age Rewind product. This time it's the Dark Circle Concealer. This product is about $9 and comes in 6 shades (fair, light, medium, honey, neutralizer, and brightener). I own the concealer in both fair and brightener. This product is meant for your under-eye circles to help conceal and brighten that area.


What I Like: I really really like this concealer. I find that on my skin, the shades match perfectly and the formula feels really nice. It blends into my skin nicely, especially if I use my ring finger. When I put it on under my eyes, it gets rid of my big, gross under-eye circles immediately and also gives a bit of a brightening kick to my under-eyes. It also works as a regular concealer on blemishes around my face as well. I've repurchased this multiple times now, it's one of my favorites.


What I Dislike: It sometimes creases around my eyes, but I find that almost every concealer does this to me. Like I mentioned in the Age Rewind Dark Spot Concealer, it has horrible packaging. The foam/sponge applicator is unhygienic and doesn't allow you to control the amount of product you use. 


Overall: I recommend this product, flaws in all. I feel the product speaks for itself and really smashes down the imperfections in the formula. I'm a huge fan of this, only because I find it really does wonders to cover those under-eye circles and blends nicely into the skin, especially when paired with a light foundation or BB cream on top


NYX HD Photogenic Concealer


The last concealer I'm going to talk about it the NYX HD Photogenic Concealer. This concealer is only $5 and comes in a whopping 11 shades. (porcelain, fair, light, beige, medium, glow, tan, nutmeg, yellow, lavender, and green) This is smooth, lightweight, and has speciality shades for sallowness (lavender), green (redness), and yellow (under-eye darkness). I use 'Light'.


What I Like: I love this concealer. For starters, the price is unbeatable. It's the cheapest one on this list and easily one of the best here. I love the formula it comes in; silky and soft, but not runny. It also matches skin tones really nicely, especially because it has lots of different shades for any skin tone. I find it covers blemishes as well as cancels out dark-circles and brightens up my under-eye area.


What I Dislike: There's not too much product in each tube, it's a bit smaller than your average concealer wand. There was also a little bit of creasing as well.


Overall: I absolutely adore this concealer. It's dirt cheap, which makes up for the lesser amount of product, and really effectively covers up my blemishes! Go get some of this!

A RECAP of this post:

Winners: Sonia Kashuk Hidden Agenda Palette, L'Oréal Visible Lift Serum Concealer, Maybelline FitMe Concealer,  Maybelline Instant Age Rewind Dark Circle Concealer, and the NYX HD Photogenic Concealer

Losers:  Rimmel Match Perfection Skin-Tone Adapting Concealer, Garnier Skin Renew Anti-Dark Circle Concealer Roller,  and the Maybelline Instant Age Rewind Dark Spot Eraser


I find that drugstore concealers are a really great place to explore what kind of formula, shade, and covering capabilities you want in your concealer. They have the advantage of price on the higher quality products (Mac Pro Longwear, Nars Creamy Concealer, etc.) and let you really experiment with your makeup.


One overall problem with drugstore concealers is that they often have a few things wrong with them that I think would have been solved by a more substantial and higher-end makeup company; things like packaging, product pigmentation, and shade variety. I also think that drugstore concealers lack the ability to really tackle the 'settling into fine lines and wrinkles' thing. Almost every product I use creases in all the wrong places.


Obviously, these are not all the drugstore concealers out there, but I think this is a good mix of products that a lot of people might be wanting to try out or already have purchased. I really want to try out not only more drugstore concealers, but some more high-end concealers as well!

Let me know your faves and any reccomendations on concealers you might have!


Thanks for reading!!


xo Emily


My Fave Quick, Cute, and Easy Hairstyles

Monday, June 23, 2014

Hello! Happy Monday. I hope the start to your week has been good! I've been watching a lot of the World Cup and can't get enough. I've played football (soccer) for my entire life so this is a really special time of year for me!

I mean, just look at me on my first team back at age 4. So, so tough. Right??? 


Ok enough of baby Emily, I know if I go on you will all be blinded by my cuteness so I guess it's time for the actual blog post! 


Today's post is going to be about hair (as the title might indicate). 


Over the years, I've gone through a fair number of hair styles. Today I'm going to share with you some of my favorite quick, cute, and easy hairstyles that I personally love!


The health and strength of your hair is incredibly important which is why I let mine air dry today. It's nice to give your hair a rest now and then: all the heat from curlers/dryers/straighteners is really damaging - and if you do use these make sure to keep your hair strong by using a heat protectant spray. My favorite is the TRESemmé Thermal Creations Heat Tamer Spray which I've used for a long time now. It's a great protectant against heat and to top it off, it smells amazing.

After my shower, I used the Pantene Smooth Lisse Argan Serum. I pumped a dime-sized amount onto my fingers and massaged it into the ends of my hair. I love moroccan/argan oil and this particular version smells great and has really made my hair healthier and shinier as of late!

That's my really basic, post-shower routine for my hair: just a bit of argan oil and either air drying or blowdrying!

On the days where I decide not to leave it wavy or put it up in a messy bun or ponytail, I usually do a variation of a few different cute, quick hairstyles.

Today I'm going to tell and show you how I do these styles. 

I find they're all super simple, quick for a busy morning, and really cute!

Keep reading for 5 hairstyles I guarantee you'll love!


1. Halo Braid Down-Do 


You've probably seen halo braids on almost everyone now (and probably across all sorts of beauty sites), but I still love this style for me and anyone!

To create this I follow 6 easy steps:

1. With your hair middle-parted, take a strip of hair from one side of the part. The strip of hair should be taken from the front of your head. Depending on how you want your finished braid to look, take as much or as little hair as you want. Obviously, a thicker strip of hair will give you chunkier braids and a thinner strip will give you smaller braids. I took about a medium-small strip of hair. I also left about the same amount of hair out of the strip, wanting to have a 'bangs' effect. 

2. Braid your strip of hair and secure it with an elastic band. I used Goody Elastic Clear Hair Ties. After you secure this braid, do the exact same thing to the other side of your hair. 

3. Flip your braid upside down and bring it across your head in the area where a headband would normally lay. As you bring it across your head, make it as tight or as loose against your head as you want. I kept mine taut against my head because with my medium-length hair, it looks better that way. 

4. Secure the braid you've brought across your head behind your ear area with a few clips or bobby pins. Don't worry if you can see the bobby pins still. We'll be covering that later.

5. Do the same thing with the braid from the other side of your hair. Bring it across your head and bobby pin it behind your ear on the other side.

6. Now, bring the hair that isn't stuck on the bobby pins, back forward and tease it until it covers the pins. I also kept those bits of hair out for a 'bangs' look, so that helped cover the bobby pins. Do your hair however you want from here. I find giving it a bit of tease or curls makes for a fun twist.


Here's the finished look. I love love love this!

I know that's a super complicated explanation of halo braids and I'm sorry. There are awesome tutorials on youtube and on other blogs so check those out since mine really isn't cutting it :)

2. Teased Half-Updo (with optional braids)


This look is an absolute stunner. I wear this as much as I can and find it looks awesome at nice/dressier occasions. 

It's literally the easiest thing to accomplish as well. 

All you have to do is act as if you're putting your hair into a half-ponytail. Then, take a comb and tease the hair that you would've been putting in your half-ponytail (just backcomb the underside of the hair to get the teased, big-hair effect). After your hair is teased and big and bold, just finagle it into that same half-ponytail shape but instead of a hair-tie, we're going to use bobby pins to pin it back and push it up for even more volume and height.

You can leave your up-do at that if you choose, like my photo on the left or you can add a fun twist to it.

My fun twist is halo braids. I just grab some of the remaining hair and create two braids, bring them across my head, and secure them with bobby pins. It looks so cute and gives your half up-do something extra! (Don't forget the hairspray!)


3. High Bun with Accessories 


Another easy look. This one is a high-bun that is easy to add hair accessories to. To achieve this, all I do is give my hair a bit of teasing (backcomb it) and then pull it up into a messy high bun. The real fun is when you add the stuff to it!

One fun look is to add a bow (mine's a pink faux-leather bow from Forever 21) to the back or the front of your bun. It gives a more formal and girly touch!

More fun things to add to your bun are headbands! Mine are from various places including H&M, Forever 21, and Brandy Melville


 4. The Classic Curl


This is pretty self-explanatory but I'll tell you about it anyway. Basically, I just use a curling wand (whatever is your favorite will do!) and curl my entire head! I alternate the direction of the curl every chunk of hair so it looks more natural and then finish with a bit of hairspray. I love curly hair - there's lots of things you can do or add to it.

5. Deep Part + Waves


My last favorite and quick hairstyle is so so so simple. I start with curly hair that I brush out to create waves and then all I do is make a deep part on one side of my hair and then tease up the other side so I've got really voluminous waves. It looks really good on anyone and it's simple, yet glamourous. 

I hope you enjoyed learning about my favorite quick and cute hairstyles! 

xo Emily

P.S. GO watch some of the World Cup. NOW!!!!


My Favorite Concealer of the Moment

Sunday, June 22, 2014

I've always loved trying out new concealers. That, and mascara, are some of my favorite things to have a variety of in my makeup collection.

That being said, I decided to try out the L'Oréal Visible Lift Serum Absolute Concealer. I really like L'Oréal face products - their Lumi Magique ones in particular - so I thought this might be something I was interested in.


The Visible Lift Concealer comes in a small tube and you have to twist the bottom of the tube for the product to come out the top. It's really easy to just spread on your skin from there. It's got a lightweight formula and is really soft, smooth, and silky upon application.

Since I bought it this concealer about two weeks ago, I've been using it pretty regularly. I really like it so far and it's become my favorite concealer of the moment. The color I've been using - fair - has really blended great with my skin tone and I've loved how it looks under my eyes. It doesn't really settle into your wrinkles and lines and gives a bit of a brightening, highlighter effect as well as concealing. 

Be sure to blend the product in as soon as you put it on your skin, because it drys and cakes somewhat quickly. Also, be aware that you've really need to blend this product completely in or it won't look flawless.

It only comes in four shades, which might not be great for everyones skin tones, especially if you're in between shades, but other than that.... I'm loving this.


To apply it, I make sort of a triangle shape under my eyes, put some down my nose, above my nose, and down my cupid's bow and chin. I blend that in with my fingers or a brush.


I LOVE how it looks on my skin. It blends flawlessly and my under-eye area looks absolutely perfect. It's also amazing in photographs.


I think this is a great concealer and it really makes me excited to try more products similar to this from L'Oréal. 

xo Emily


Emily's Berrytastic Smoothie: Fresh and Healthy for Summer

Saturday, June 21, 2014

As you may or may not know, today is the official first day of summer! Today, June 21st is the Summer Solstice and the official day to kick off barbeques and pool parties aplenty!

According to my house, it's summer!
For me, and many others, summer started a whole month ago as we got out of school but I can appreciate the legitimacy of the 'First Day of Summer'. 

To celebrate Summer and to survive the truly hot and sticky day that was this Summer Solstice, I decided to make a cold, 'Berrytastic' smoothie! This is one of my favorite things to make: It's so easy, incredibly healthy, and just perfect for a hot summer day! (It also doubles as dessert, it's that sweet, creamy, and delicious) This also fits in with my 'Getting Fit and Healthy' theme that I've got going so I decided to share this with you!


If you want to learn how to make this yummy and healthy smoothie, keep on scrolling!! And Happy Summer!!!! 

All you need to make 'Emily's Berrytastic Smoothie' is:


- Fresh or Frozen Berries of your choice (I used Strawberries, Blackberries, Raspberries, and Blueberries!) - Feel free to add/subtract the berries of your choosing. 
- Plain or Vanilla Yogurt (Mine is the Chobani 2% Plain Yogurt)
- Milk (I used Whole Milk to make it super creamy)
- A bit of sugar
- Fresh Mint

And last but not least, you need a blender and a few glasses to put your yummy smoothie in!

To start, I cut up about 8 whole, fresh strawberries and placed them in my blender. This is where I popped in about 1 tablespoon of sugar as well. (the sugar is an optional step and I don't usually do it, but I really wanted a sweet batch of smoothies this time)


Next, I threw in my frozen fruit. I love buying frozen fruit for smoothies because it's really easy to just throw in your blender since it's already all good to go. I let it thaw for a few minutes before putting it in.


I added about 15 blueberries, 15 raspberries, and 15 blackberries but choose whatever combo you want!


You always need some sort of liquid in your smoothie, so that it will actually blend. For this one, I added Horizon Organic Whole Milk. I prefer using the Whole Milk because it makes my smoothie very creamy. Because I'm not using ice cream or heavy, whipped cream, I think the whole milk is acceptable. I pop about a cup or so of this in with my fruit. Depending on how thick or how think you like your smoothies, experiment with the liquid you add in. You can always add more, so be cautious! (If you're lactose intolerant - which I have a mild form of - try cranberry or orange juice in lieu of milk)

Next, I put in one container of Chobani 2% Plain yogurt to add more creaminess to the mix. 


Now, all you have to do is blend, blend, blend until you've got the consistency of smoothie you want! At this step, I added in a few more blackberries because I felt like I needed a bit more of their taste! 


I also popped in a fresh oraganic mint leaf to add some freshness and kick to the smoothie! I love buying fresh mint in these little tiny packages. I always find I don't need as much as I think and these help cut back on waste!


 One more circle in the blender, and we've finished! The smoothie came out beautiful and delicious! To garnish, I cut a strawberry and added a mint leaf as well as adding a fun straw! This is one of my favorite smoothie recipes and I hope someone trys it out!! How good does it look??? Eating drinking healthy never tasted so good. Enjoy!


xo Emily

How I Keep Fit: Walking

Friday, June 20, 2014

Today I'm going to talk about fitness! I plan to do plenty more posts on fitness but this is just a quick one for your Friday!

I've always been a very active person. I've played soccer and tennis my whole life and feel at home playing sports and being in constant movement.

After I graduated high school and went into college, my fitness dropped a little bit. The 'Freshman 15' is real and it's out there. 

My weight fluctuates, but I am really mostly concerned about my fitness. When you're putting good things in your body and keeping active, you will be healthier now and in the future.

I know it might be hard for some of us to actually get up off the couch and off the computer, especially during summer when that's basically what it's for right? But I think it's super important to get some sort of physical activity everyday in addition to eating healthy and drinking lots of water.

One way I keep fit is incredibly simple. All you have to do is walk. It's as simple as that. 

If you spend about 30 minutes everyday taking a walk, you're going to be healthier. Of course, you can go a step further and add in cardio and aerobics, but if you want to start out with something light, get a walk in everyday.

I love walks. You can go with a friend or a family member and have fun getting in shape with them, or you can make it your own time: bringing your iPod and listening to music or one of my personal faves, listening to audiobooks.

You can really make the time your own!


If you take a walk at night, you're guaranteed a lovely view of the sun setting: Like the pics above of my sky. 

So drink up that water, eat those leafy greens, and take a walk! I guarantee it'll be fun and relaxing as well as incredibly beneficial to your health!

xo Emily