Showing posts with label beauty. Show all posts

AUTUMN MAKEUP TUTORIAL VIDEO

Thursday, December 1, 2016

Hello everyone! 

Welcome to the very first day of Blogmas! Like I mentioned in yesterdays post, I've decided to try and do both Vlogmas and Blogmas. Blogmas means I'll be posting every single day through Christmas with makeup tutorials, gift guides, and so many other fun holiday themed posts. 

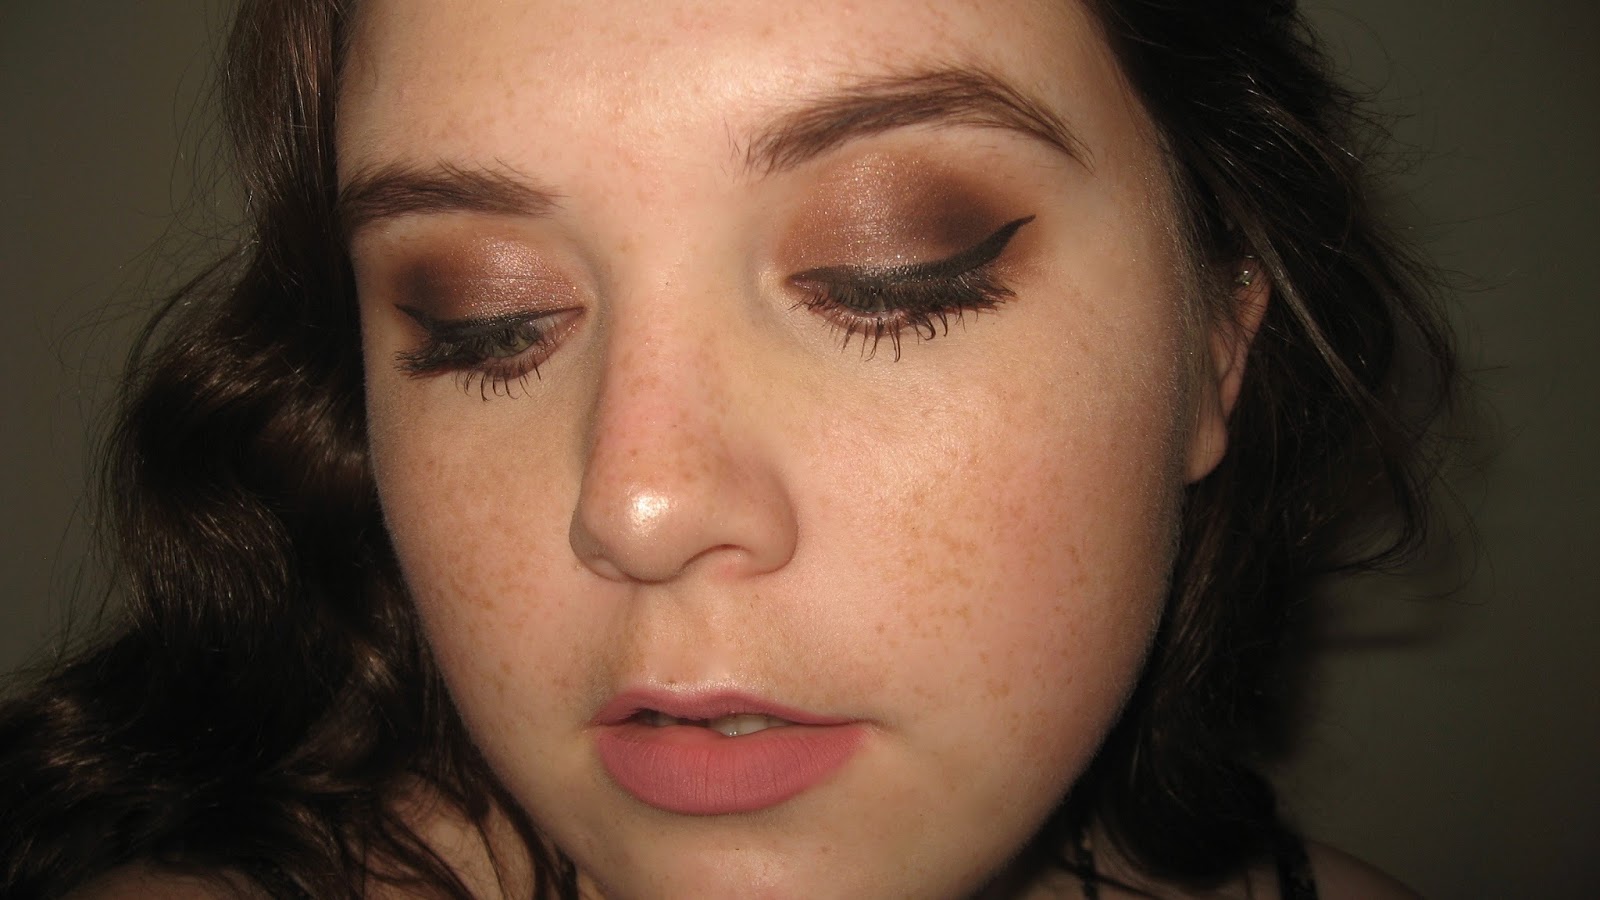
For the first post, I've got a great new makeup look for you today! This is my Autumn Makeup Tutorial, a look I've been wearing on the regular as its gotten cooler out. Once again, I've been loving the Lorac Pro 3 Palette to create a beautiful Autumn color palette. I think this is a perfect everyday look for the season.


I love how this turned out and I hope you do too. If you want to learn how I did this, watch my tutorial below! All items used will be listed at the end of this blog post! Hope you enjoy.


~ PRODUCTS MENTIONED ~
L'Oreal Magic Lumi Primer:

Tarte Colored Clay CC Undereye Concealer (Light-Medium):

Real Techniques Miracle Complexion Sponge:

Collection Lasting Perfection Concealer (Fair):

Original Beauty Blender:

Coty Airspun Loose Face Powder (Translucent):

L'Oreal Brow Stylist Definer (Brunette):

Lorac Pro 3 Palette (Dark Brown):

Anastasia Brow Wiz (Dark Brown):

Glossier Boy Brow (Brown):

Anastasia Contour Kit (Light-Medium):

The Balm Mary-Lou Manizer:

Lorac Behind the Scenes Eye Primer:

Lorac Pro 3 Palette (Terracotta, Cool Taupe, Amethyst, Light Pewter, Almond Pearl):

Stila Stay All Day Liquid Liner (Black):

L’Oreal Telescopic Mascara (Blackest Black):

Kylie Cosmetics 'Koko K' LipKit:

xo - Emily

AUTUMN LIPS

Friday, November 4, 2016

Happy November! I can't believe we're at this point already. I feel like everyone says this in every blog post, youtube video or tweet, but it's so true! It feels like last week I was graduating college and yesterday I was struggling through the muggy New York summer. 

Thank goodness we're past that point because we are finally in one of the most wonderful times of the year: Autumn! Specifically, Autumn in New York, which is so magical. 

In today's post I'll be sharing four of my favorite Autumnal lip combinations. These are the colors I've been wearing lately because they shout 'Autumn Cheer' and I love that. 

My first favorite is the Kylie Cosmetics LipKit in 'Leo' which is a deep burgundy. It veers on almost dark purple and dark red, which makes for such a great shade on the lips. It's dark and vampy and perfect for Autumn nights out.


Next up is something a little sweeter and more demure. It's the Burberry Lip Velvet in 405 'Nude Rose'. When I first got this product I felt a little bad because it was expensive and over the top but I've quickly realized that it's priced that way for a reason. Realistically I know that mostly it's for the name 'Burberry' but these really are fantastic lipsticks. This shade, which is a pinky nude, comes across lighter on flash, but looks like a subtle nude in person. I love how moisturizing and long-wearing it is also!


My next Autumn Lip choice combines two of my tried and true favorites: The NARS Satin Lip Pencil in 'Rikugien' and MAC's Lip Liner in 'Whirl'. These two have been in my makeup collection for years and I thought that I would combine them to make a perfect berry lip color for the fall. The combination is a great mix because deep purple and rich red, making for that unforgettable lip color that is so enviable as a 'Your Lips But Better' shade.


For my last Autumn Lip, I've gone with the traditional red. But to spice it up, I've combined two of my favorites to create a red that is a deeper than your typical shade. To create this look I first lined my lips with the Kylie Cosmetics 'Kristen' Lip Liner and then filled in the top with Makeup Forever's Rouge Artist Intense in '39'. 


I love how all of these lips turned out and they've definitely become part of my #AutumnLook. 

What are your favorite lip shades for the Fall?

xo Emily

LORAC OBSESSED

Monday, September 12, 2016

I think I'm in love...again. 

And I'm not talking men...partly because I'm very single and partly because I love other things way too much to even have THE TIME, goddamnit! I'm talking LORAC Cosmetics. In particular, the Pro Palettes.

I truly can't get enough of the LORAC Pro Palettes because they're damn perfect. If you follow my blog or my Instagram - you know I'm a huge fan of the LORAC Pro Palette 2 (I've yet to try #1) and kind of use it everyday, everywhere. (true story, I used it for all-over robot halloween face makeup once) 

So when I went into ULTA a few weeks ago and saw the LORAC Pro Palette 3 , I knew I wanted it. I had originally gone in to look for the Anastasia Beverly Hills Modern Renaissance palette because I tried it out thanks to my bb Taylor and it's freaking gorgeous, but of course, they were sold out. So when I saw that the sleek little Pro 3 had some similar shades, I thought I'd spend money I didn't have on it! Yay being a college graduate!!!

It's just like the previous two palettes - same size and shape, which I love. The thinness is really nice because there's nothing worse than a clunky palette (I'm talking to you Naked 3). The inside is even better than the outside. 


You get a huge mirror - which is never really a selling point for me due to the fact that I literally can't do my makeup unless I have a big mirror - but it's actually really handy in this one. In addition, it comes with a mini LORAC eye primer.

It has 16 shadows - 8 shimmer and 8 matte - all in the warm-toned fam. 


I've swatched all the shimmer shades and they're pretty phenomenal. The softest and lightest of the eight are Light Gold and Almond Pearl - but they show up better on an eyelid than my gross, pale arm anyway. (even better with a primer)
  

My favorite of this set is 'Light Pewter' for a shimmer shade and the matte 'Cool Taupe'. It's great for a crease color bc we all know you need to check the crease before you do anything else. 


I'm loving the shimmer shadows of 'Amethyst' and 'Rose Bronze' in this set and CANNOT GET ENOUGH of 'Terracotta'. SHIZ that is a nice freaking shadow. 

And as you can see below, the darker shimmer shades swatch a lot better on my arm. (Also check the toenails in this pic, real professional)


I've had it for a few weeks now and the colors wear incredibly. They're long-lasting, pigmented, and gorgeous (as expected) and I really love it. Coincidentally, it has replaced my Pro Palette 2 as my everyday palette. That's okay, Pro 2, I'll always come back to you <3

Do you have a Lorac product you love?

xo Emily

SUMMER MAKEUP TUTORIAL - Shimmery Golden Skin (With Video)

Saturday, July 16, 2016

Hello everyone! 

Today's post is all about this beautiful, shimmery summer makeup look! Today's post is even more special because I decided to film and edit this tutorial into a fun YouTube video for you all! 


I really love how this turned out and I hope you all enjoy. I've got the products used listed below and in the video's description box.


~ PRODUCTS MENTIONED ~

Maybelline Baby Skin Instant Pore Eraser:

L’Oreal Infallible Pro-Glow Foundation (202 - Creamy Natural):

Tarte Maracuja Creaseless Concealer (Fair):

Maybelline Instant Age Rewind Concealer (Fair):

Rimmel Stay Matte Powder (001 - Transparent):

Too Faced Chocolate Soleil Bronzer:

Too Faced Papa Don’t Peach Blush (dupe):

Anastasia Brow Wiz (Dark Brown):

Glossier Boy Brow (Brown):

Lorac Pro Palette 2 (Buff, Light Brown, Mocha, Cocoa, Rose) :

Milani Bella Eyes Gel Powder Eyeshadow (Bella Gold):

Stila Stay All Day Liquid Liner (Black):

L’Oreal Telescopic Mascara (Blackest Black):

Rimmel Exaggerate Lip Liner (Eastend Snob):

Rimmel Show Off Lip Lacquer (Nude Eclipse):


xo Emily

Back to Dramatics

Saturday, June 4, 2016

This post is inspired by the very fabulous and outrageous Real Housewives of Beverly Hills, which I've been binging thanks to my friend Bridget, whose Instagram bio (for the longest time) was "I'm passionate about dogs, just not crazy about bitches" one of the best taglines from Lisa Vanderpump. 

In every episode, these women are completely glammed up and it's outrageous. I'm not sure I've ever seen them without makeup and it's honestly impressive. And because lately, I've been really not doing much with my makeup - thanks to a big move and the sweaty, sweaty heat of New York - I thought I'd be inspired by the ladies of RHOBH and go all out. If you're interested in this makeup look, keep reading and if you're interested in hearing more of my rambles about my true love, TV, go check out my other blog... (lol shameless plug I'm sorry). 


Here are (some) of the products I used for this look. These are the ones that truly made it #glam. 


I wanted it to be not only pretty dramatic, but really glowing and bright - which is why I went #hamsandwich on the highlighter. 

I started with the same base I usually go with - Maybelline's BabySkin Primer, Tarte's Creaseless Concealer, and the Maybelline Instant Age Rewind Concealer and let that set with the Rimmel Stay Matte Powder. For my brows, I used the best - Anastasia's Brow Wiz. 


For this eye look, I used a Tarte holiday palette. For the crease, I blended 'Yule Be Surprised' and 'Mulberry & Bright' together to create a deep brown and burgundy look. For an added shimmer, I used 'LA LA' from ColourPop. To really add definition, I blended that together continually to really make it seamless. For the lid, I used 'Shining Star' - a shimmery chestnut shadow. 

To create that delicious cat-eye, I used Stila's Liquid Liner. To get really intense and thick lashes, I used Maybelline's Miss Manga Rock Mascara, which is so volumizing and dark on the lashes.


With the eyes done, I decided to really shimmer up my face. I used one of my favorite highlighters from ColourPop Cosmetics - Lunch Money which is light gold with a reflective duo chrome finish. Plus it's so affordable at $8! Adding more glam is Tarte's 'Social Butterfly' bronzer. I don't usually use a lot of bronzer but for this look, I wanted to make it dramatic. 

Finally, because I went all out with the eye look and highlight, I wanted a subtle and natural lip look. This #YourLipsButBetter shade is Rimmel's Exaggerate Lip Liner in 'Innocent'. 

Voila! Here's the look. Am I on my way to becoming a housewife? Probably not, because they're batshit crazy...

xo Emily

Getting Glossy With It / Simple Spring Makeup Using GLOSSIER

Monday, May 9, 2016

Hey guys! If you follow my instagram (which you should), you know I've been loving the brand Glossier. The brand began on IntoTheGloss.com, one of the most successful and beloved beauty blogs (which includes me) and from that, Glossier was born. It's a line of incredible skincare and makeup products and it's incredible. Today's post features Glossier to create a really sweet and simple makeup look!


From the packaging to the product, Glossier is a marvel. I haven't been this impressed in a brand in awhile. 

I purchased the Stretch Concealer and the Boy Brow, the latter of which took me months to even purchase due to its popularity (and I can see why). I decided to craft a simple, spring makeup look using these two products in action. 

 The Stretch Concealer ($18)is so lightweight and buildable, and looks incredible on the skin. I love how elastic and easily movable the concealer is, it makes it easy to leave a great finish on your skin. Plus, you're really never going to run out of it.


The other product I brought was the Boy Brow in brown. ($16) This is one of my favorite brow products, ever, because of how easy and quick it is. There's nothing better than just throwing on brow gel and getting out of the house and this is the perfect gel to do that. It's perfectly pigmented, natural, and affordable!


So for the makeup look below, I'm using those two products, along with three others to create a simple spring makeup look. It's easy and quick and so pretty and fresh for the season!


To create this look, I started by applying the Stretch Concealer to my blemishes and under my eyes, slowly building the product up until everything was covered. To set that, I used Rimmel's Stay Matte. Next up, I filled in my brows using the Boy Brow, brushing through them and fully defining them. 

To make my lashes stand out with my defined brows, I used generous coats of the L'Oreal Telescopic Mascara to really lengthen them. 

Finally, to create that simple and sweet spring look, I used the YSL Rouge Volupte Shine in 'Coral Ingenious'.   


I really love how this look turned out and I loved using my new Glossier products to create something so cute and sweet!

What new brands have you been loving?

xo Emily

One Brand Makeup Look / L'ORÉAL

Hi everyone! Today's post is another One Brand makeup look just like the one I did for Maybelline. This one is about one of my favorite brands, L'Oreal. 


To get this look, I used five L'Oreal products. To start out I made sure my face was moisturized before going in with the Infallible Pro-Matte 24 Hour Foundation. This foundation only costs $12.99 and the bottle lasts forever! This is one of my favorite foundations because it stays on all day and has a range of 12 shades perfect for any skin tone. I wear 101 'Classic Ivory'. To blend this into my skin I used a beauty blender, which leaves a really smooth finish. 

Because the finish of the foundation is matte, I usually skip a setting powder. Instead, I moved onto my eyes. (my eyebrows were Glossier's Boy Brow) 

To get this look, I used both the Infallible Silkissime Eyeliner in True Teal and the Infallible Lacquer Gel Liner in Espresso. I used the gel liner to line both my top and bottom lid lightly and then went in with the Silkissime liner on my upper lid to create a fun and striking eyeliner look. The gel liner, which stays on all day, creates a great primer for the teal liner for added longevity.


To finish off the eyes I applied one of my favorite mascaras, the L'Oreal Telescopic. Even with a few simple coats of this product, your lashes will instantly lengthen and look incredible. I really love this mascara and often, on a simple makeup day, I'll wear this alone with some concealer and brow product.


To finish off this one product makeup look, I used the Colour Riche La Lacque Lip Pen in Choco-Lacque. I love this lip pen because it's so pigmented and you only need one swipe to fully coat your lips. 

  
 So that's the finished makeup look for L'Oreal. I love this brand for its quality, affordability, and the fact that everything I wear from them is long-lasting and beautiful!

Hope you all enjoyed. What should my next #OneBrandLook be?

xo Emily

Spring Nails

Thursday, March 31, 2016

Hey everyone! I'm so excited to say that it's finally looking a lot like Spring in New York. The weather has been so strange for the past few months, alternating between snow and cold to temperatures in the 70s. But this week has been lovely, with flowers blooming and floral dresses coming to the streets of Manhattan.

Today's post is all about Spring Nails. I'm going to show you one of my favorite ways to spruce up your Spring nails and share a few of my favorite nail polishes for Spring!

~

One of my favorite ways to add something extra to my nails is with a texturized topcoat, glitter, or a matte finish. Today's nail look starts with one of my favorite nail polishes ever, Zoya's 'Dot', a pale and glossy pink that I pop on when Spring comes around. 

To add some pizazz, I've added Essie's glitter topcoat in 'Jazzy Jubilant' on top of 'Dot'. This is such a nice addition to any Spring nail polish you might have on and I like how the glitter catches in the sun, really reminding you of how vibrant and glamorous it is. 

Funnily enough, 'Jazzy Jubilant' which I've had for over two years, is featured in Cosmopolitan's picks for perfect nail polishes for this Spring! Great minds, eh? 


You can add this topcoat to any of your favorite Spring nail polish colors, but I've given you a few of my own favorites for inspiration below!

Spring Nails

1. Zoya 'Dot' ($10)
6. Essie 'Shades On' ($8.50)

What are your favorite shades for Spring?

xo Emily

Glamorous and Romantic Valentine's Makeup!

Friday, February 5, 2016

Hello everyone! With Valentine's close approaching, I thought I would share a few Valentine's looks. The first one is a glamorous and romantic look perfect for date night, girls' night, or a night in! (if you want) 


I love Valentine's Day because I'm a hopeless romantic. I hope this look inspires some of you, if you also celebrate! If not, it's a great look for a fun night out!


Here's how to get this glamorous and romantic makeup look:


1. Start with a primer. Because I'll be wearing full foundation, I want the primer to help the look stay all through the day and on whatever Valentine's night plans you'll be on! I'm using one of my favorites, Maybelline's Baby Skin Primer, which is affordable and helps reduce the appearance of pores. I placed it in my T-zone, focusing on the area near my nose.
2.  Next up I'm going in with a long-lasting and loved foundation, the L'Oreal Infallible Pro-Matte. On holidays or big nights where you want to be sure you look and feel comfortable (especially if you're on a date) wear one of your favorite foundations. This is a great one because it keeps your skin looking matte and stays on all night!
3. To cover any redness or discoloration, I used the Maybelline Instant Age Rewind Concealer around my nose and under my eyes. It instantly (get it?) covers dark circles and looks natural and beautiful in person and in photos!
4. Because it's a holiday, I went an extra step further and covered any extra blemishes with the NARS Radiant Creamy Concealer, one of the best concealers I've ever used. 
5. To set all of that product, I used my favorite setting powder, the Rimmel Stay Matte. You won't be shiny and it'll keep your product in place all night!
6. Because I'm using a few mattifying products, I wanted to give myself a lot of highlight. I used The Balm's Mary-Lou Manizer on my cheekbones, beneath my brow bone, my cupid's bow, and down the bridge of my nose. I love this highlight because it's natural, but also glam.
7. To give myself more color, I bronzed with Benefit's Hoola Bronzer.
8. To add a bit more color, I used Benefit's Rockateur Blush on the apples of my cheeks. 
9. To fill in my brows and reshape them, I used Anastasia Beverly Hills' Brow Wiz in 'Dark Brown'. This is one of the best eyebrow products you can buy. Despite being $21, it lasts a long time and looks natural.
10. Because I'm doing heavy eyeshadow, I primed my lids with the Lorac Behind the Scenes Eye Primer.
11. To create that beautiful romantic pink eyeshadow look, I used 'Trick' from the Urban Decay Naked 3 Palette across my lid. It's a super shimmery pink shadow that looks lovely when blended with other shadows in the palette. To give it even more pigment, I sprayed a bit of the NYX Setting Spray on my brush and then patted it on. I blended the shadows 'Nooner' and 'Liar' into my crease to create definition.
12. I gave myself a little playful cat-eye (which is so appropriate for Valentine's) with the Kat Von D Tattoo Liner.
13. One of my favorite mascaras, the L'Oreal Telescopic was a perfect way to finish off the look, because it lengthens and volumizes your lashes!
14. Because it's Valentine's Day, I wanted to go all out with a pink lip. I started by lining my lips with MAC's 'Whirl' Lipliner and then....
15. Coated my lips with the YSL Rouge Volupte Lipstick in #1 'Nude Beige' because it's pretty, feminine, and pink as can be. 
16. Finally, I set the look with the NYX Matte Finishing Spray, to keep everything in place!

(Excuse my weird face in this??? The makeup is still cute, though)

That's my first Valentine's look, I hope you all liked it!

xo Emily