Everyday Smoked Out EyeLiner / Makeup Look

Friday, January 30, 2015

Hey guys! Sorry for the spotty posting as of late, but I had a bit of computer mishap and a very busy schedule so I'm finally back in the swing of posting! Today's post comes to you in the form of a makeup look. I've been loving doing this smoky, smudged out eyeliner look and thought I'd share how I do it with you! 


1. I want to keep my skin free of an exorbitant amount of products so I'm forgoing foundation because this is an everyday look! I'm starting out with Maybelline's Instant Age Rewind Concealer to cover up all and any blemishes I have and to really brighten my under-eye area. 
2. To fully conceal my terribly dark under-eyes, I'm going in with a second concealer, Tarte's Creaseless Concealer. This just adds a bit more coverage. 
3. To set the concealer and keep it from moving throughout the day, I'm using Rimmel's Stay Matte powder. This is an absolute favorite and it just helps to keep your makeup staying all day and mattify everything. 
4. For my everyday look, I want to bring some color back to my face. I use NYC's Sunny Bronzer along my cheekbones and around my face to just get that sunkissed glow back to my complexion.


5. Again, I want to continue to bring color back to my face so I'll use Benefit's Rockateur Blush on the apples of my cheek.
6. I can't go without a highlight and this one by The Balm, the Mary-Lou Manizer is perfect for an everyday look. 
7. Brows time! An absolute favorite, Anastasia's Brow Wiz is my preferred method to fill in and shape my brows. 
8. For eyeshadow, I'm using only shades from the Lorac Pro 2 Palette. I'll start with a mixture of 'Nectar' and 'Light Brown' on a big fluffy brush and blend that into the crease until I have enough build up. Next, I'll use a mixture of 'Beige' and 'Rose' on the lid to give a bit of shimmer to the look. To darken everything up, I go back into the crease with 'Cocoa'. 
9. Here's where the 'Smoked Out Eyeliner' comes in. First, I go in with L'Oreal's Lineur Intense liquid eyeliner and line my top lashline, adding a medium sized cat eye. Once this is done, I go in with a black eyeshadow, 'Black' from the Lorac Palette. Taking a pencil brush and that shadow, all I did was brush along where I had already placed eyeliner, smudging it out to create that smoky look. I also brought the shadow down to my lower lash line to balance the look.
10. To finish the eyes I used Maybelline's Miss Manga mascara which gives incredible length to my lashes.
11. For my lips, I used one of Rimmel's Exagerrate Lip Pencils in the color 'Addiction'. This is such a great dupe for Mac's 'Spice' and 'Whirl' liners. It's that perfect 'Your Lips But Better' lip shade!
12. The last step is to keep your face all set and matte. To do this, I spray a bit of NYX's Matte Finish Spray on my face!


I really love how this turned out!

xo Emily

Caped Crusader

Saturday, January 24, 2015

I've been having a cape moment. AKA I've been sort of obsessing over these gorgeous capes from Topshop. I put together two cute outfits to go with my favorite capes from Topshop. I love that you can dress them up or down and they're just so easy to throw on over jeans!

Are you feeling the cape obsession too?

Cape 1
Cape 2


xo Emily

Have you met Matt(e)?

Wednesday, January 21, 2015

The word matte is pretty bizarre. For the longest time, I wasn't even aware that being 'matte' was a thing you could be. I didn't really know that 'matte' was apparently a way of life in the beauty world (my friend referred to it as that once, it makes me laugh still). When I finally understood the meaning behind being matte, or met Matt(e) as a I refer to it, I kind of understood.

If you're not aware, 'matte' refers to when something is "dull and flat, without a shine." Which sounds uber gross and not fun and not a way of life. I guess the better way to describe it, when referring to makeup and beauty, is that being matte means you are without shine and oil and your skin looks flawless and clean. 

Leaving my skin matte is often one of my favorite ways to finish off my makeup look (the other is leaving it more glowy and shiny and then the final one is the look where I don't put any effort in whatsoever, the standard look). It leaves you looking put together and pretty darn flawless.

To get that matte skin that you might sometimes see in my blog posts, I rely on two pretty important products. 

One of these products comes at the beginning of my makeup routine and then the other product is the very last step.

Matte Me Up!


After I've finished putting on foundation and using concealer, I take a big fluffy powder brush and swish that around in Rimmel's Stay Matte Powder in 'Transparent'. I'll either place it across my whole face or concentrate it on my T-Zone to really cut down on shine. I absolutely adore this product. If you read my blog I'm sure you're aware of this fact. Not only is this powder affordable ($4), it'll last you more than a year. I've had my same powder for about 10 months now, and I'm not done yet! Plus, it really is the best product for cutting down on shine and making you all 'matte'. I love that it has a 'Transparent' shade because that means I'm not adding any extra color or thick powder that I really don't want on my face. I would take it over any high end product any day.

Once I've finished all my makeup, I use a second product to matte everything. That product is NYX's Matte Finish Setting Spray. After everything is done, I spray my face with this product and it makes it completely matte and without shine (if you want glowy skin, they also have a glowy setting spray!). Again, this is affordable ($7) and is just the easiest, fastest step if you want to matte up your face!

I hope you guys enjoyed these suggestions to 'Stay Matte', I really love them and think they work wonders!


xo Emily

Currently Coveting: Makeup

Thursday, January 15, 2015

Currently Coveting: Makeup


I've got my nails done up....

Tuesday, January 13, 2015

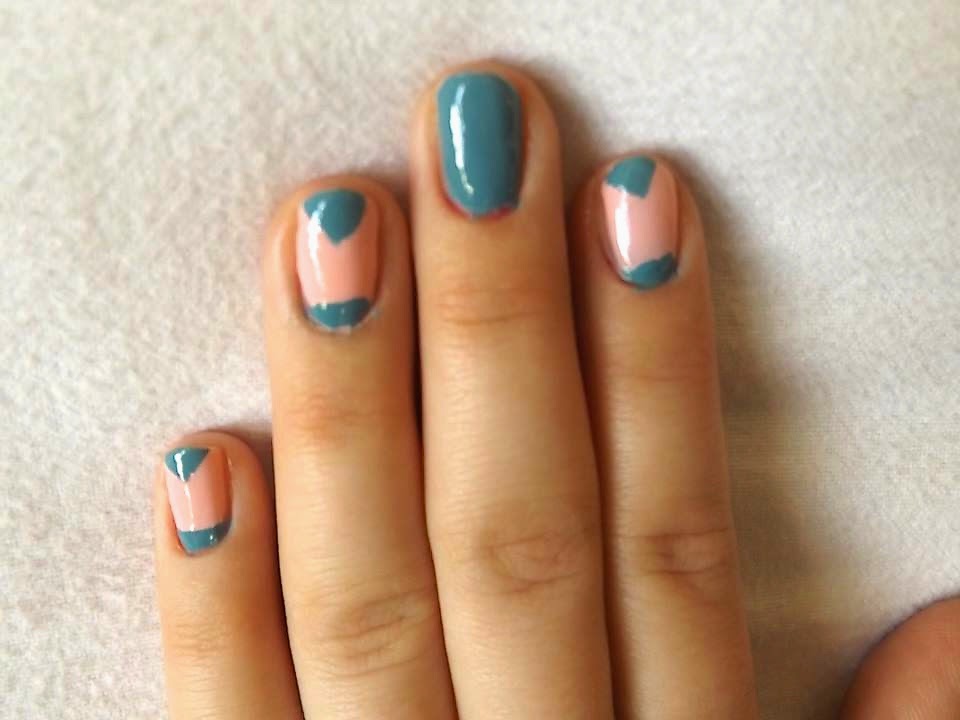
Hello everyone! Today's post is nail polish themed, which is so fun because I absolutely love painting my nails. There's not a day when I've got bare nails and it's always fun to spend time experimenting with color and design!  

My nails today are inspired by this "Winterize Your Nails" color swatch from Julep. My favorite two shades were 'Shari' and 'Kiki' so I decided to do a bit of an inspired look using my own nail polishes. 


To get this nail look, I started by painting all my nails with a light pink shade and then once they dried, I cut out bits of tape and then put them on my nails to make the shapes I wanted (triangles for the top of the nails, and a small strip of tape at the bottom to get that little band of turquoise) and then painted the non-taped parts using a pretty blue/turquoise polish. 


To add some extra protection, I used a topcoat once everything dried. I find using a topcoat in winter helps to keep your nails lasting longer, especially as our nails will crack and be more damaged in frigid temperatures. 


And if you live any place where it's cold right now, you'll know that we're having record setting low temperatures. It's incredibly important protect your skin and body against the cold. If you liked my winter friendly makeup tips, then these tips for 'Winterizing' your nails will also come in handy.


Did you like my nail polish look today? I think I might do more of these, they're super fun and gives me an excuse to buy more polish (sorry bank account!). I keep creeping on all of Julep's pretty new colors, someone stop me! 


xo Emily

Currently Craving

Monday, January 12, 2015

Currently Craving


Silver Smoke

Saturday, January 10, 2015

Hey guys! Today I'm showing you a look i've titled 'Silver Smoke' because it's silvery and has just the faintest bit of smoky eye element to it. It's mild enough to wear everyday but also has enough smoke and glam for a night out!


I'm using the Lorac Pro 2 Palette for today's look and I love how it turned out!


To Create This Look: 

1. Prime your eyes. I used the Lorac Behind the Scenes Eye Primer that came with the palette. 
2. Take 'Light Brown' and begin to blend it into your crease. This will be a base for the darker crease colors later.
3. Pat 'Snow' across the entire lid. This shimmery white shadow will look beautiful paired with the silver shadow we'll use on top of it.
4. Blend 'Cool Gray' into your crease, adding up the color so we get a really defined smoky eye.


5. Pat 'Silver' across your whole lid, focusing on placing the most color on the inner and middle of your lid.
6. To get that added definition that we want and to really live up to the 'Silver Smoke' name, we'll take 'Charcoal' and blend that into our crease. It'll make it more defined and will look wonderful with the silver shadow on our lid.
7. Using a small brush, bring 'Charcoal' down to your lower lash line. Line the lash line nearest to your tear duct area with 'Silver', which will help balance out the look. 
8. If you choose, line your upper lash line with either a liquid, pencil, or gel liner. I used Maybelline's Gel Liner today and flicked it out for a cat-eye.
9. Finish off with the mascara of your choosing. I used Too Faced's 'Better Than Sex' mascara. 


I've got Benefit's 'Rockateur' on my cheeks with a bit of highlight courtesy of Too Faced's 'Inner Light' and my lips are full and pretty due to MAC's 'Whirl' Lip Pencil. I really love how the eyes turned out and I think it's going to be one of my go-to looks from now on. 

I also loved experimenting with the Lorac Pro 2 Palette, which I absolutely adore. It's really such an amazing product and the shadows are so well-made, pigmented, and blendable. I'll do a full review post on it soon, but (spoilers!) it's a winner so far!


Hope you're having a wonderful day!

xo Emily