Showing posts with label hair. Show all posts

She-Lob

Wednesday, May 27, 2015

Long time no blog! I thought I'd share something pretty fun and big that happened to me to begin my re-entrance into regularly scheduled programming (finals took a lot out of me). 

I got my hair cut!!! I'm very excited about this cut because it's exactly how I love my hair to look. I've always had short hair - it's been my preferred length - but lately I've been growing it out to the longest it has ever been. 

But yesterday, I got so hot walking around the city with my hair on my back and I decided to go for it and just chop it off. Since I literally made the appointment day-of, I went to Dramatics NYC at their 57th St. location and got a last-minute appointment with Shine. She  was a master with my hair and I recommend her to anyone!

I got a long bob (lob) with a few layers in the front and I absolutely love how it turned out. The last time I chopped my hair off so significantly, the hairdresser took way too much length from it and I ended up hating it for a month until it grew out. But this is the best ever.


I can't wait to experiment with my new hair!

xo Emily

Hair-Raising

Wednesday, April 22, 2015

In the past few years, I've gone through quite a few different hair colors and styles. When I started college three years ago, I was excited to experiment. I had only ever gotten highlights in my hair so college meant crazy colors, all the time.

Currently, I've got an ombre/bayalage/highlighty look going on with my hair. I just switched it up a few weeks ago, after months at the same dark brunette shade. I did it myself, and think it turned out pretty cute. 


It's also fun to think about what my hair color means to me and what it says about me. I think with how much I change it up, it definitely means I like to stay as trendy as possible (mostly I fail at that), and that I'm definitely a creature of change. I want people to notice my hair and appreciate the changes I do to it. 

My hair color is ever-changing, unique, and fun which exactly matches my personality. I use my hair color to represent myself and I think I do it pretty well. 

I'm always looking to find new hair dyes and hair products to make sure my hair stays healthy and strong. I love Madison-Reed's hair color advisor, which allows you to input your current hair color, hair type, and desires for future hair styles and they match specific hair dyes to you so that you can find colors to match your skin type and personality!

I usually end up curling or leaving my hair naturally wavy, especially when it's multiple colors, because it looks fun and cute. After I shower I use Pantene's Argan Oil Serum, which leaves it detangled and incredibly soft. Then, I either blow-dry or air-dry my hair. To create my natural and quick waves, I love the Remington curling wand, which heats up fast and holds a curl. (Be careful though, it gets super hot. I've burned myself too many times to count. Once, I burned my thigh, which is wholly embarrassing)


I finish by giving my hair volume with the L'Oreal Boost It Volume Inject Mousse to my roots, and then spraying with the TRESemme Keratin Smooth Illuminating Spray, which leaves my hair shiny and pretty.

What are your favorite hair dyes and products to use on your hair? 


♡

xo Emily

New Years Eve Hair / How-To

Tuesday, December 30, 2014


Hey guys! Happy New Years Eve Eve! Today's post is about the hair I'll be wearing for the New Years Eve Holiday. I decided to go really wavy with it, which is a bit out of my comfort zone, but I think it turned out nicely. I also wore a variation of this hair style to one of the Christmas parties I attended and people seemed to like it!


1. First off, I comb out my hair and spray it with a heat protectant. My favorite is the Tresemme Heat Protectant Spray, it helps to protect my hair and it smells really good to boot!
2. Next up, I take my Remington Diamond Shine Slim Wand, which has a .5 - 1 inch wand, and start curling my hair. {I love this curler, and if you're interested in curlers like this there is also a great alternative from Con-Air that I love.} 
3. To get these waves, I take small section of my hair and wrap them around the wand away from my face, and hold them for about 6 seconds. This gets the curls the perfect tightness and also allows me to be able to comb them out later.

Hair Favorites

4. After I've curled my entire head, I put two sprays of the Uniq One Hair Treatment in my hands and brush through my curls with my hands, really massaging the product in. This is one of my favorite all-in-one sprays because not only does it help protect your hair, it also keeps it shiny and pretty and defrizzes everything! 
5. To add more volume, I first tease the top section of my hair {to do this, all you have to do is backcomb your hair} and then I also spray some of the Batiste Dry Shampoo to add an extra bit of pop. I love this product because it's tinted for those with Brunette hair {like me} so you don't get that annoying powdery look on your newly done-up hair!
6. Lastly, I do one more comb through my hair using a brush, to make the curls look a lot more natural and then I spray some of the Tresemme Fine Mist Hairspray in my hair, which helps keep the curls in place. 

♡

That's it for my New Years Hair How-To! I hope this helped a bit, or gave some inspiration for your holiday hair. Tomorrow I'll share some of my dress picks for the holiday plus my makeup look :)


xo Emily

New School Year, New Hair

Friday, August 29, 2014

My new school year starts in a few days and I thought I'd spruce up my hair for the occassion. Gone is the blond from my hair, and here to stay is the dark brown (my original color).


I love how it turned out and I'm so excited for the new year :)

xo Emily

Quick Hairstyle How-To

Monday, July 14, 2014

Happy Monday! I've got a Quick Hairstyle How-To today! Enjoy!


Hey guys! Happy Monday once again! Today has been quite stressful to say the least. 

Like a lot of people, I have had a huge problem with ingrown toenails (yuck!) and last fall had to do the procedure to remove them from both of my big toes! It was very painful! What is even worse then the pain is that unless you do an even more extensive, painful procedure where they put chemicals where your nails are, they grow back easily! That's what happened to me! So today I got my two big toes done once again and let me say, it was not fun! So I'm just in bed recovering now, because it hurts to walk! 

Me loving life at the Podiatrist, as you do!


I thought I'd share with you a how-to of a favorite hairstyle of mine; the halo braid half updo! I've shared this hairstyle before but really wanted to do another post on it because I've been wearing it constantly!

♡

There are just 8 easy steps to achieve my favorite hair look!


1. Brush out your hair completely, making sure you haven't got any knots. I also gave mine a bit of a tease so that I'd have more volume.
2. Curl your hair. I try for the 'beachy wave' so I just use a bigger curling wand (3/4 inch or higher) and alternate curling towards my head and away from my head.
3. Pull your hair into a typical half-pony/updo. Secure it with bobby-pins.
4. Take about a 1 inch piece of hair from the side of your head (like above) and braid it.
5. Keep your braid pretty tight or even give it a little bit of tug to separate it for texture. 
6. Do the same braid on the other side.
7. Bring one braid across your head in a 'Halo' fashion (hence the name), secure it with bobby pins.
8. Bring the other braid across your head and place it next to the other halo'd braid! Secure with bobby pins!

Finish up the look with hair spray, sea salt spray, and shine spray and Voila! You have the Halo Braid Half Updo!


The final look from the back! I love the messy look to this!


So that's the look! Hope you guys liked it!

♡

I'll just be lazing around with my nurse (Freckles), my medicine (Ibuprofen and chocolate), and my entertainment (Psych). 


Have a great week friends!

xo Emily

Hair MAGIC!??!!??

Monday, June 30, 2014

Hellllooooo friends! Happy last day of June! I can't believe that this month is already over, it seems like yesterday that I was finishing up classes and getting into the swing of summer. I can't imagine how fast July is going to go by :(

Sorry for being a bit MIA on the blog this weekend - I had some surprise family visitors who I hadn't seen in awhile stop by and so I was just spending some quality time with them! 

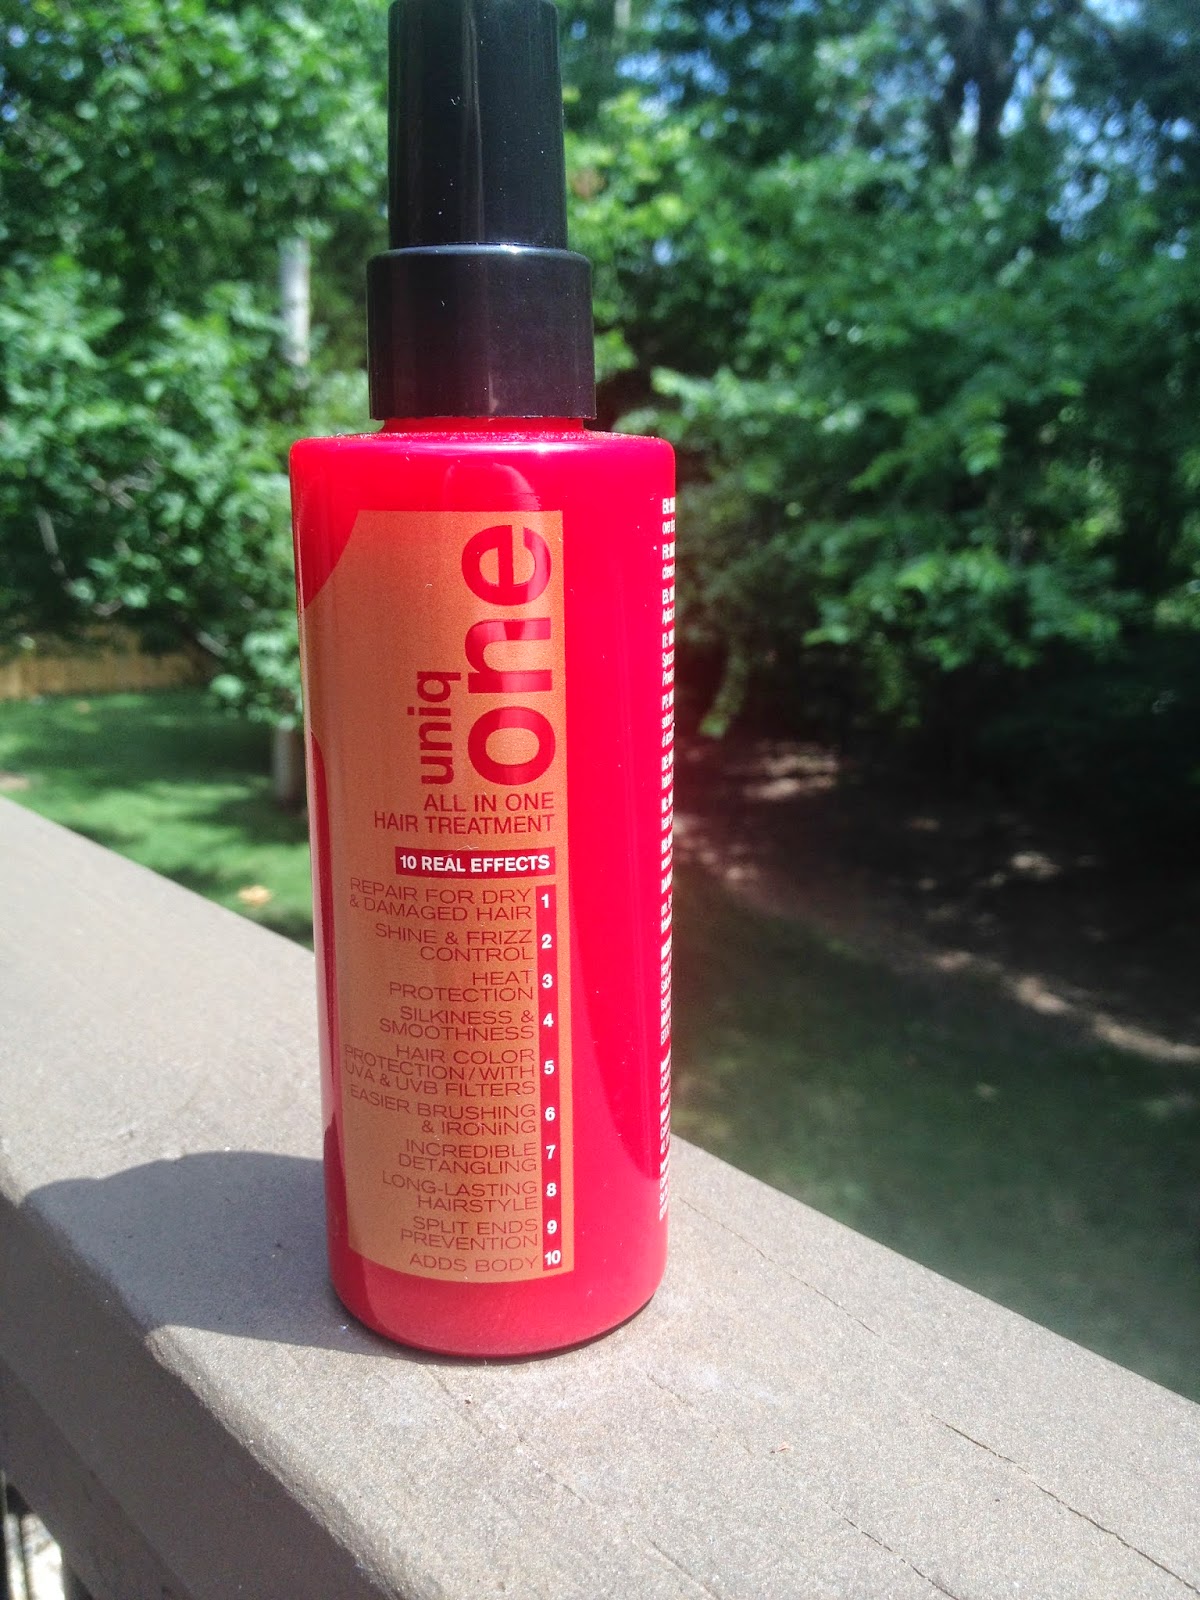
But...back to the blog! Today I'm going to be talking about my absolute favorite hair product - I think ever. The beauty I'm talking about is the Uniq One All in One Hair Treatment. It's this amazing spray for your hair that has 10 Real Effects that treat your hair, keep it healthy, and make it shine. 


The 10 Real Effects:

1. Repair Dry and Damaged Hair
2. Shine and Frizz Control
3. Heat Protection
4. Silkiness and Smoothness
5. Hair Color Protection with UVA and UVB Filters
6. Easier Brushing and Ironing
7. Detangling
8. Long-Lasting Hairstyle
9. Split End Prevention
10. Adds Body

And I can totally attest to these 10 benefits. It does every single one of them. I cannot tell you how healthy, beautiful, and smooth my hair feels and looks after I use this. It's my favorite product and I think I could honestly live without any other product if it meant I could keep using this forever. 

I spray this in my hair when it's damp, usually after my shower and you really don't need much. It immediately shines and detangles your hair, as well as gives you a pump of volume. It also smells fantastic but that's just an added bonus.


I've been using this for a little over a year. My aunt, who is a hairdresser and owns her own salon, used this in my hair and then gave me my own bottle and it's been my go-to product ever since. I love, love, love this stuff and absolutely recommend it as a kind of all-in-one, everything spray! 


Recently, they came out with a limited edition Coconut Uniq One spray and I love that as well. It makes you smell like you've been hanging out on a tropical island and does everything the original spray does.

This costs about $20 depending on where you get it but it lasts such a long time and is such a fantastic product, I really never mind buying this!


What are your favorite hair products?

xo Emily


My Fave Quick, Cute, and Easy Hairstyles

Monday, June 23, 2014

Hello! Happy Monday. I hope the start to your week has been good! I've been watching a lot of the World Cup and can't get enough. I've played football (soccer) for my entire life so this is a really special time of year for me!

I mean, just look at me on my first team back at age 4. So, so tough. Right??? 


Ok enough of baby Emily, I know if I go on you will all be blinded by my cuteness so I guess it's time for the actual blog post! 


Today's post is going to be about hair (as the title might indicate). 


Over the years, I've gone through a fair number of hair styles. Today I'm going to share with you some of my favorite quick, cute, and easy hairstyles that I personally love!

♡

The health and strength of your hair is incredibly important which is why I let mine air dry today. It's nice to give your hair a rest now and then: all the heat from curlers/dryers/straighteners is really damaging - and if you do use these make sure to keep your hair strong by using a heat protectant spray. My favorite is the TRESemmé Thermal Creations Heat Tamer Spray which I've used for a long time now. It's a great protectant against heat and to top it off, it smells amazing.

After my shower, I used the Pantene Smooth Lisse Argan Serum. I pumped a dime-sized amount onto my fingers and massaged it into the ends of my hair. I love moroccan/argan oil and this particular version smells great and has really made my hair healthier and shinier as of late!

That's my really basic, post-shower routine for my hair: just a bit of argan oil and either air drying or blowdrying!

On the days where I decide not to leave it wavy or put it up in a messy bun or ponytail, I usually do a variation of a few different cute, quick hairstyles.

Today I'm going to tell and show you how I do these styles. 

I find they're all super simple, quick for a busy morning, and really cute!

Keep reading for 5 hairstyles I guarantee you'll love!

♡


1. Halo Braid Down-Do 


You've probably seen halo braids on almost everyone now (and probably across all sorts of beauty sites), but I still love this style for me and anyone!

To create this I follow 6 easy steps:

1. With your hair middle-parted, take a strip of hair from one side of the part. The strip of hair should be taken from the front of your head. Depending on how you want your finished braid to look, take as much or as little hair as you want. Obviously, a thicker strip of hair will give you chunkier braids and a thinner strip will give you smaller braids. I took about a medium-small strip of hair. I also left about the same amount of hair out of the strip, wanting to have a 'bangs' effect. 

2. Braid your strip of hair and secure it with an elastic band. I used Goody Elastic Clear Hair Ties. After you secure this braid, do the exact same thing to the other side of your hair. 

3. Flip your braid upside down and bring it across your head in the area where a headband would normally lay. As you bring it across your head, make it as tight or as loose against your head as you want. I kept mine taut against my head because with my medium-length hair, it looks better that way. 

4. Secure the braid you've brought across your head behind your ear area with a few clips or bobby pins. Don't worry if you can see the bobby pins still. We'll be covering that later.

5. Do the same thing with the braid from the other side of your hair. Bring it across your head and bobby pin it behind your ear on the other side.

6. Now, bring the hair that isn't stuck on the bobby pins, back forward and tease it until it covers the pins. I also kept those bits of hair out for a 'bangs' look, so that helped cover the bobby pins. Do your hair however you want from here. I find giving it a bit of tease or curls makes for a fun twist.


Here's the finished look. I love love love this!

I know that's a super complicated explanation of halo braids and I'm sorry. There are awesome tutorials on youtube and on other blogs so check those out since mine really isn't cutting it :)

2. Teased Half-Updo (with optional braids)


This look is an absolute stunner. I wear this as much as I can and find it looks awesome at nice/dressier occasions. 

It's literally the easiest thing to accomplish as well. 

All you have to do is act as if you're putting your hair into a half-ponytail. Then, take a comb and tease the hair that you would've been putting in your half-ponytail (just backcomb the underside of the hair to get the teased, big-hair effect). After your hair is teased and big and bold, just finagle it into that same half-ponytail shape but instead of a hair-tie, we're going to use bobby pins to pin it back and push it up for even more volume and height.

You can leave your up-do at that if you choose, like my photo on the left or you can add a fun twist to it.

My fun twist is halo braids. I just grab some of the remaining hair and create two braids, bring them across my head, and secure them with bobby pins. It looks so cute and gives your half up-do something extra! (Don't forget the hairspray!)


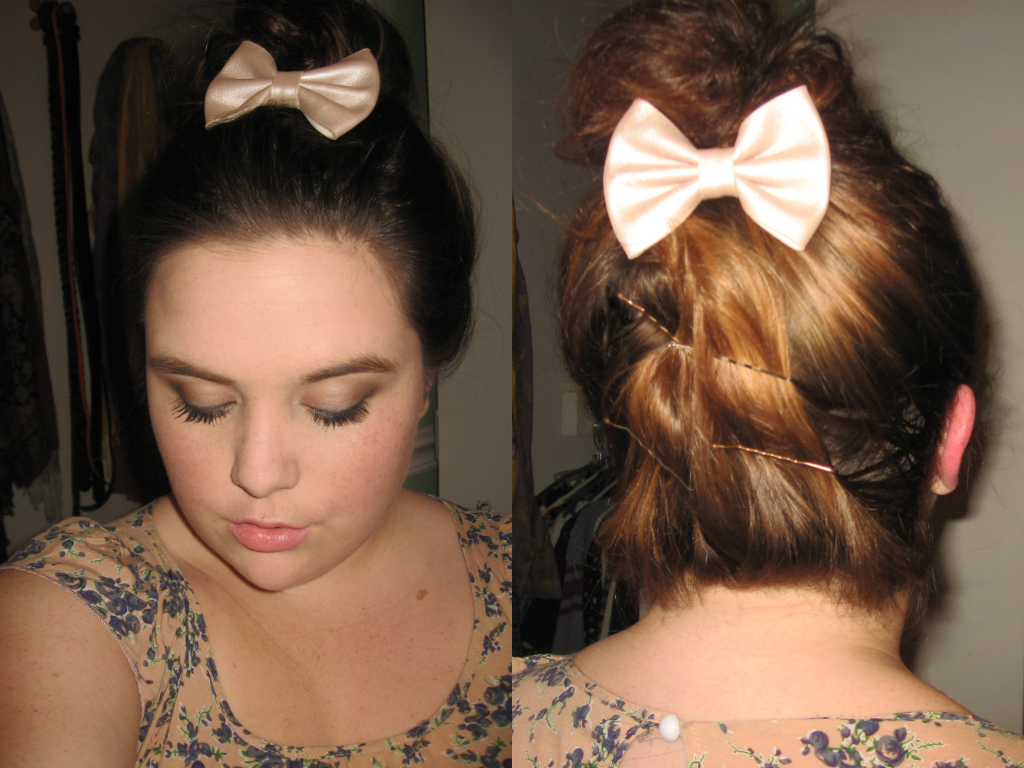
3. High Bun with Accessories 


Another easy look. This one is a high-bun that is easy to add hair accessories to. To achieve this, all I do is give my hair a bit of teasing (backcomb it) and then pull it up into a messy high bun. The real fun is when you add the stuff to it!

One fun look is to add a bow (mine's a pink faux-leather bow from Forever 21) to the back or the front of your bun. It gives a more formal and girly touch!

More fun things to add to your bun are headbands! Mine are from various places including H&M, Forever 21, and Brandy Melville


 4. The Classic Curl


This is pretty self-explanatory but I'll tell you about it anyway. Basically, I just use a curling wand (whatever is your favorite will do!) and curl my entire head! I alternate the direction of the curl every chunk of hair so it looks more natural and then finish with a bit of hairspray. I love curly hair - there's lots of things you can do or add to it.

5. Deep Part + Waves


My last favorite and quick hairstyle is so so so simple. I start with curly hair that I brush out to create waves and then all I do is make a deep part on one side of my hair and then tease up the other side so I've got really voluminous waves. It looks really good on anyone and it's simple, yet glamourous. 

I hope you enjoyed learning about my favorite quick and cute hairstyles! 

xo Emily

P.S. GO watch some of the World Cup. NOW!!!!